Applying for a Cake? Click here for an application.

Tips for Transporting, Cutting, and Safely Serving a Cake
Whether you’re a family picking up a cake or the Sugar Angel who is delivering it, here’s how to transport, cut, and safely serve your Icing Smiles cake.
You have a beautifully decorated cake — and now you have to transport, cut, and serve it. Whether you’re a family picking up a cake or the Sugar Angel who is delivering it, there are a few things you can do to have a triumphant celebration.
This spring, Sugar Angel Krystal Posey made a tie-dye TikTok cake — the “biggest and heaviest cake” she’s made to date. The family was coming to pick up the cake later that day, and despite the supports she included in the bottom layer, she was nervous about whether the cake would make it to its final destination in one piece.
Krystal hopped on the Icing Smiles’ Sugar Angels Facebook page and posed her question to the group of experienced bakers — and they responded in full force.
7 Tips for Transporting a Cake
Here are some of the top tips from veteran Sugar Angels for what you can do to make sure your cake is as perfect at the end of your trip as it was at the beginning.
1. Wrap the Cake Board
Sugar Angel Megan Wood Borg noticed that cardboard cake boards tend to get soggy, so she wraps the cake boards before building her cakes.
For tiered or heavier cakes, Sugar Angel Maria Morlock double or triple stacks her boards and duct tapes them together for added support. Sugar Angel Kathleen Cherie recommends alternating the corrugated lines of the boards for even more strength.
Wilton recommends using a cake board that measures at least 2 inches bigger than your cake. For example, if you’re transporting an 8-inch cake, use a 10-inch cake board.
2. Skewer the Cake
Sugar Angel Brittany Howe recommends putting a skewer through the middle of the cake, from top to bottom into the bottom board, after the cake is constructed. Cut the skewer so it’s a little shorter than the height of the cake so that it will sit under the frosting, and sharpen the end so that it’s able to easily go through the cake and cake board. Then slowly tap the top of it with a hammer, and conceal the hole you make on the top tier.
Kathleen suggests using two dowels for added stability and to keep the cake from spinning on just one.
Sugar Angel Anisor Fernandez follows this rule of thumb: one support per inch the cake is supporting on top. For example, a 6-inch top would use six supporting dowel skewers in the cake below.
3. Build the Box Around the Cake
Use a cake box that is the same size as the cake boards and at least 2 inches taller than your cake.
Rather than dropping your cake into the cake box, Wilton recommends building the box around the cake. Simply place the cake on the flat bottom of the box, then build up the sides and tape it closed.
4. Chill the Cake
Sugar Angel Bridget Kennedy Badams always chills her cakes in the fridge or freezer for 20 to 30 minutes before transporting them. This makes the surface of the cake less likely to smudge when packing and transporting.
To ensure the cake doesn’t sweat, Bridget tightly wraps the cake box with three or four layers of plastic wrap before she freezes it. This way, the box will sweat, not the cake.
Don’t worry, Sugar Angel Lisa Velesbir says, it will thaw in time.
5. Place the Cake on a Flat Surface
You might think the cake is safest on the seat next to you. But the slanted surface could cause your cake to slide off the board and into the side of the box, warns Sugar Angel Amy Hampton Kurtz.
Instead, place your cake on a flat, level surface, such as in the trunk of the car. Sugar Angel Toby Zaltsman uses a non-slip mat — even a yoga mat works — under the cake box for added stability, and Sugar Angel Kristen Lang sets her cakes on top of silicone trivets.
6. Turn the Air in the Car On
Kristen reminds her families to keep the temperature inside the car in mind. No heat, she says. Put the air on to prevent melting.
7. Drive Carefully
Avoid sudden starts, stops, or fast turns and steep ramps. And watch out for those speed bumps, Kristen says!
How to Cut the Cake
Once the cake has arrived at its destination, avoid smudging the cake by cutting open the side of the box and sliding the cake out rather than lifting it.
Cakes are generally designed and sized according to industry-accepted portions, which are slices that measure about 1-by-2 inches. At Icing Smiles, we guarantee a cake with a maximum of 40 servings.
To portion a cake, refer to these Wilton blogs on “How to Cut a Square Cake” and “How to Cut a Round Cake.” This video by Love Island Cakes on how to portion a celebration cake is another helpful resource, as is this Cake Cutting Guide from The Cake Conspiracy.
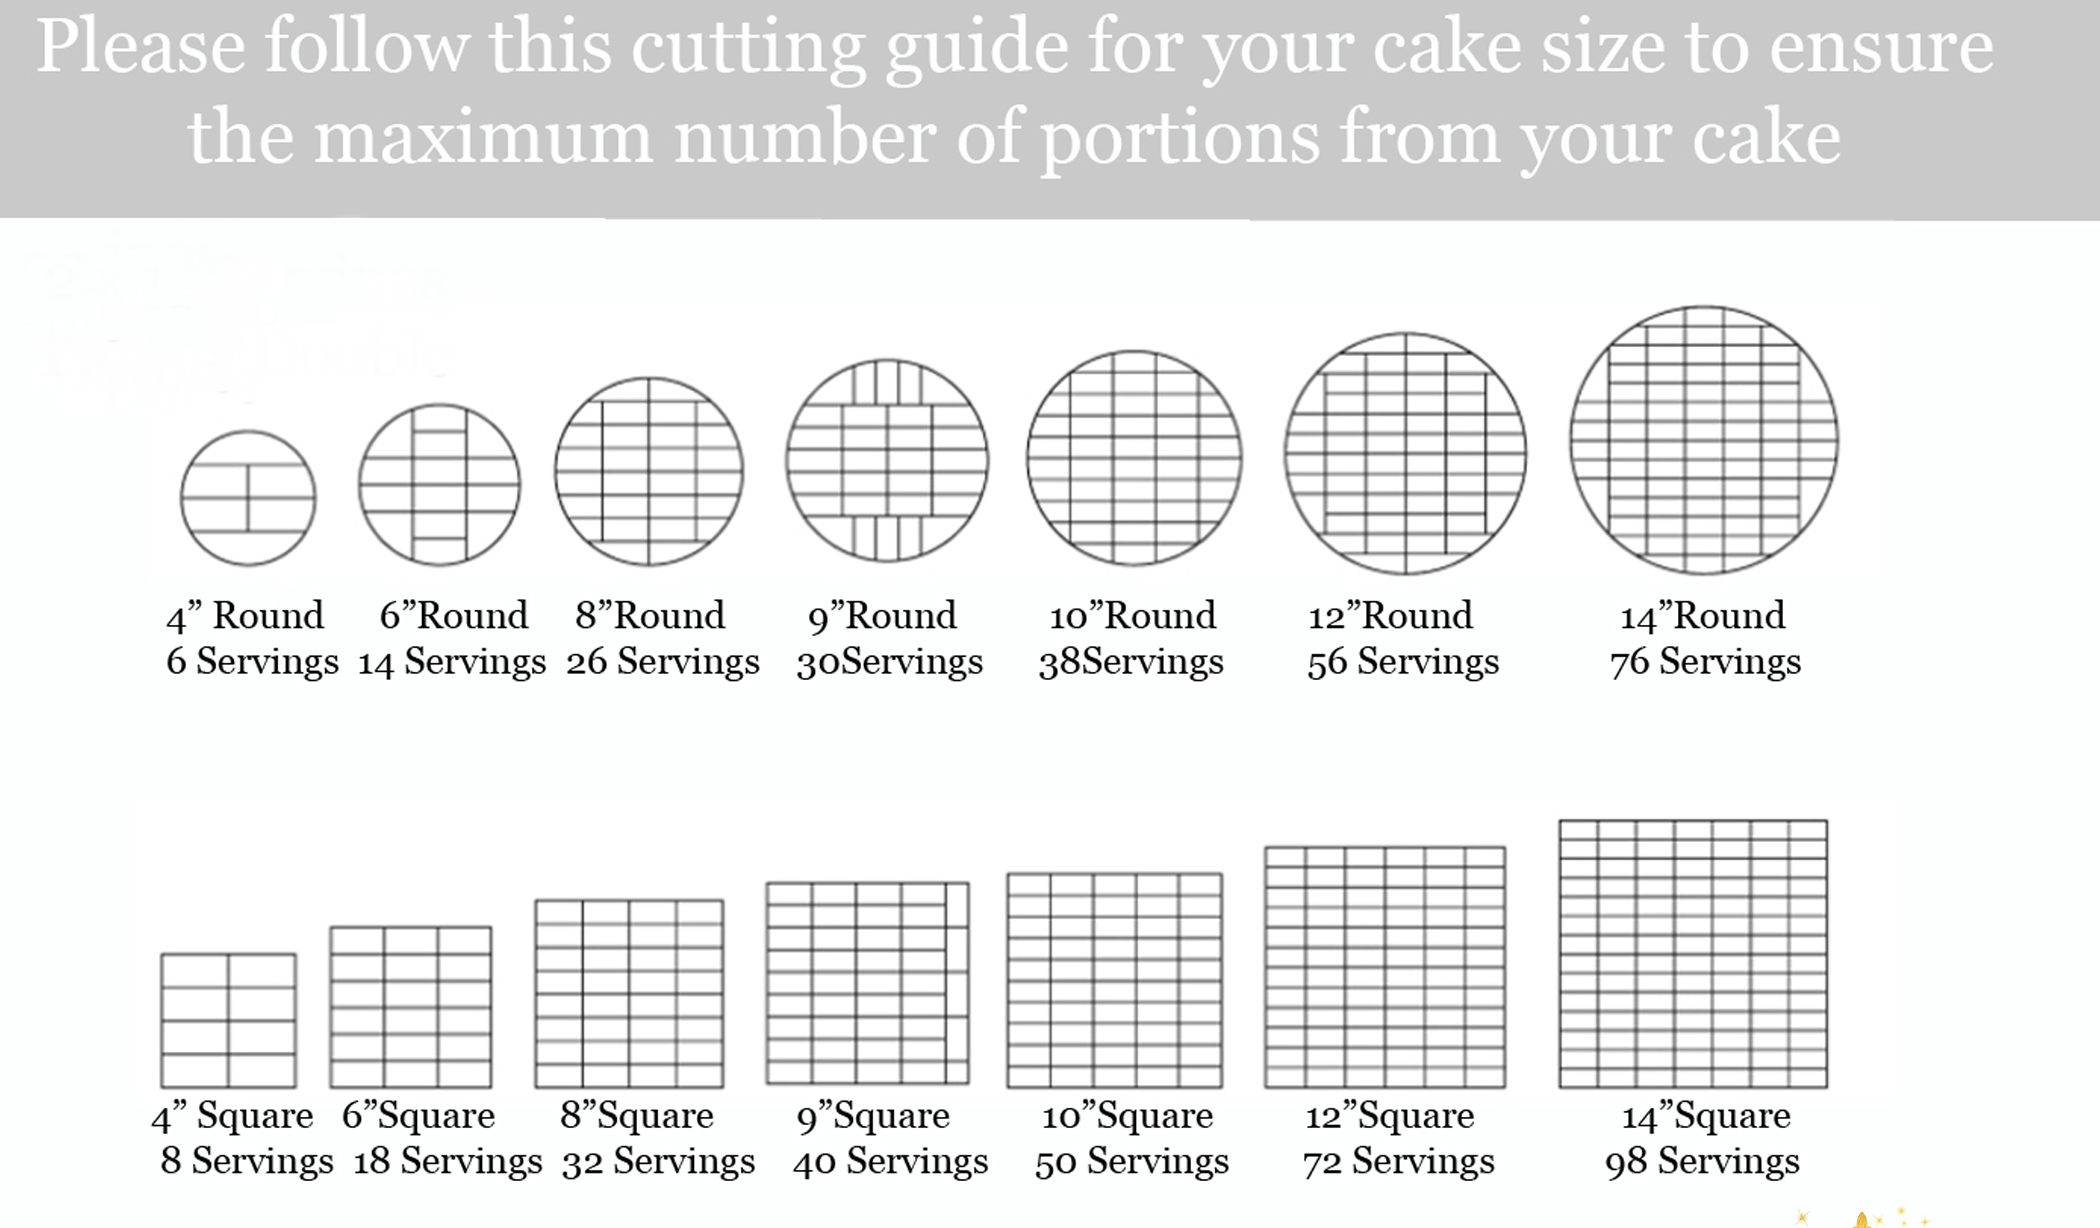
Regardless of the shape and size of your cake, here are a few additional tips and tricks to make slicing and serving a piece of cake:
- Rinse your knife in hot water or warm water after each cut of a really dense cake to prevent sticking or tearing.
- Use a serrated knife to cut fluffy cakes, such as angel food or chiffon.
- Wipe your knife after each cut of a frosted cake for nice, clean cake slices.
- Place your cake on a grip mat or textured cutting board before slicing to avoid slipping.
How to Safely Serve a Cake
As we continue to navigate the pandemic, some families may worry about the transmission of COVID-19 associated with food. According to the Centers for Disease Control and Prevention, there is no evidence of food or food packaging being associated with transmission of COVID-19.
Of course, before preparing or eating food, it is important to always wash your hands with soap and water for 20 seconds for general food safety. It’s also recommended that you not share food or eating utensils with someone outside of your household.
When it comes to blowing out candles, some families and Sugar Angels are getting creative. Sugar Angel Kristin Miller made a separate candle cake to go with the party cake so the recipient could blow out his candles safely. Sugar Angel Jean Plotkin designed a cake so the top part came off, and that’s what her daughter used for blowing out candles.
You can also extinguish the candles by waving them out with your hand; using a No Blow Candle, Blowzee, or a Wishing Wand flame snuffer; or trying this paper plate swap method.
Join Our Mailing List
If you want more tips, resources, and updates from Icing Smiles, sign up to receive periodic updates from the team. You can choose to receive the newsletters we send out every other month or to be notified when a new blog posts. We think you’ll enjoy reading about the smiles we help to create. These stories inspire us. They motivate us. And they are the reasons we are here.